If you are generating documents from Airtable and sending them for eSignature using Docupilot, you can automatically save the completed signed documents back to the matching Airtable records as attachments.
This guide explains how to set this up using Airtable Automations, Docupilot eSignature webhooks, and Airtable scripts.
Overview of the Workflow
The workflow will run as follows:
- A document is generated from Airtable using Docupilot.
- The document is sent for eSignature.
- Docupilot sends status updates to Airtable.
- Once the envelope is completed, Airtable downloads the signed document.
- The Signed document is attached to the matching Airtable record.
What You’ll Need
Before you begin, make sure you have:
- A Docupilot template already set up with eSignature Delivery configured.
- Access to Airtable Automations
Step 1: Create the Required Fields in Airtable
- In your Airtable table, create the following fields:
| Field Name | Field Type | Purpose |
|---|---|---|
Record Id |
Formula | Stores the Airtable record ID |
Signed Document |
Attachment | Stores the completed signed document |
Docupilot EnvelopeId |
Single line text | Stores the Docupilot envelope ID |
- For the
Record Idformula field, use:RECORD_ID() - This helps Airtable identify the correct record when Docupilot sends eSignature updates.

Step 2: Create an Airtable Automation for eSignature Updates
-
Next, create a new Automation in Airtable.
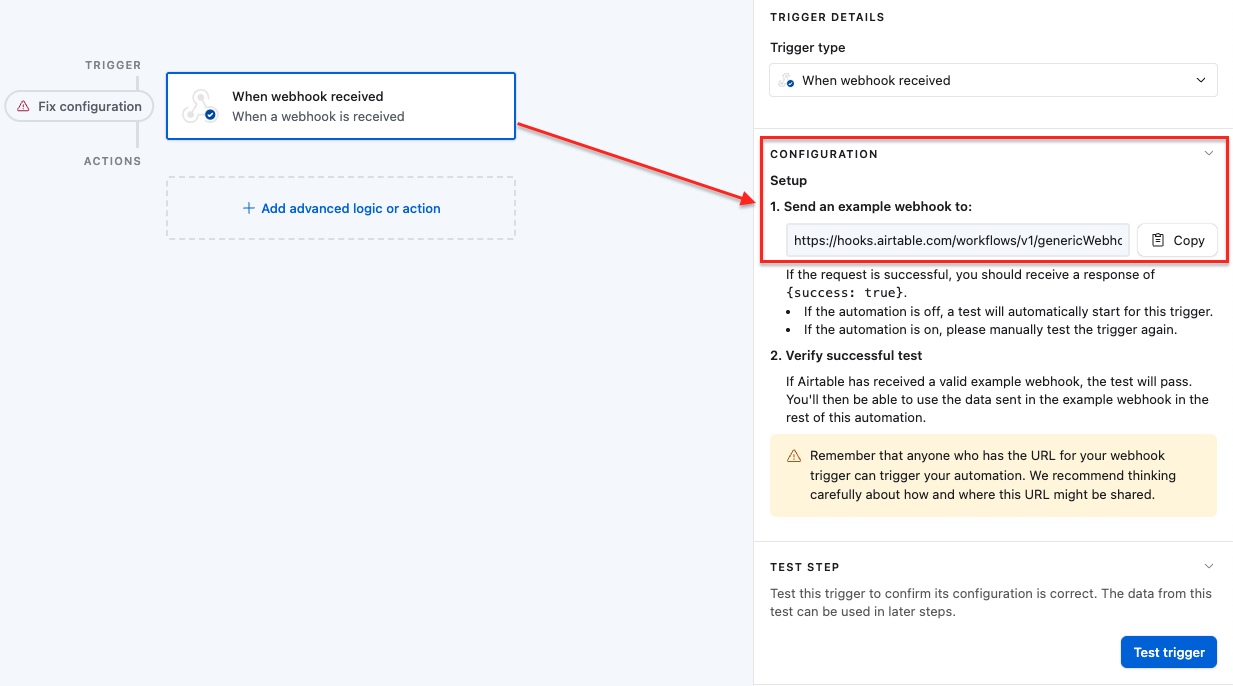
-
Add a Webhook Trigger to the automation and copy the webhook URL generated by Airtable.
-
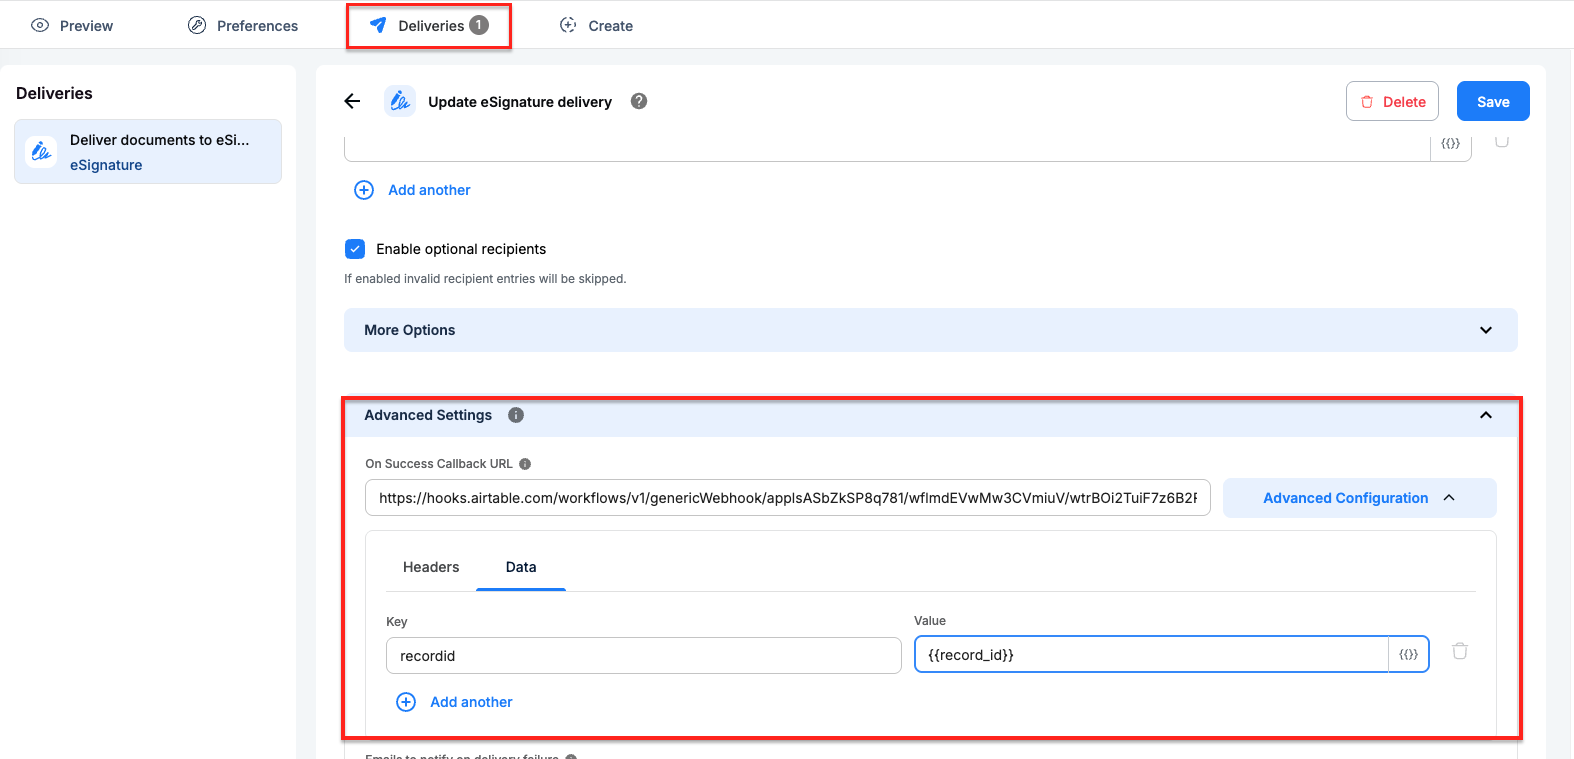
In your Docupilot, navigate to eSignature Delivery settings and paste the above copied webhook URL under Advanced Configuration
-
Under Advanced Configuration select Data to add
recordidas Key and{{record_id}}as Value. -
Save the configuration.
-
This ensures
Record Idvalue is included in the data sent to the webhook and allows Airtable to update the correct record when an envelope status update is received.
Step 3: Store the Envelope ID in Airtable
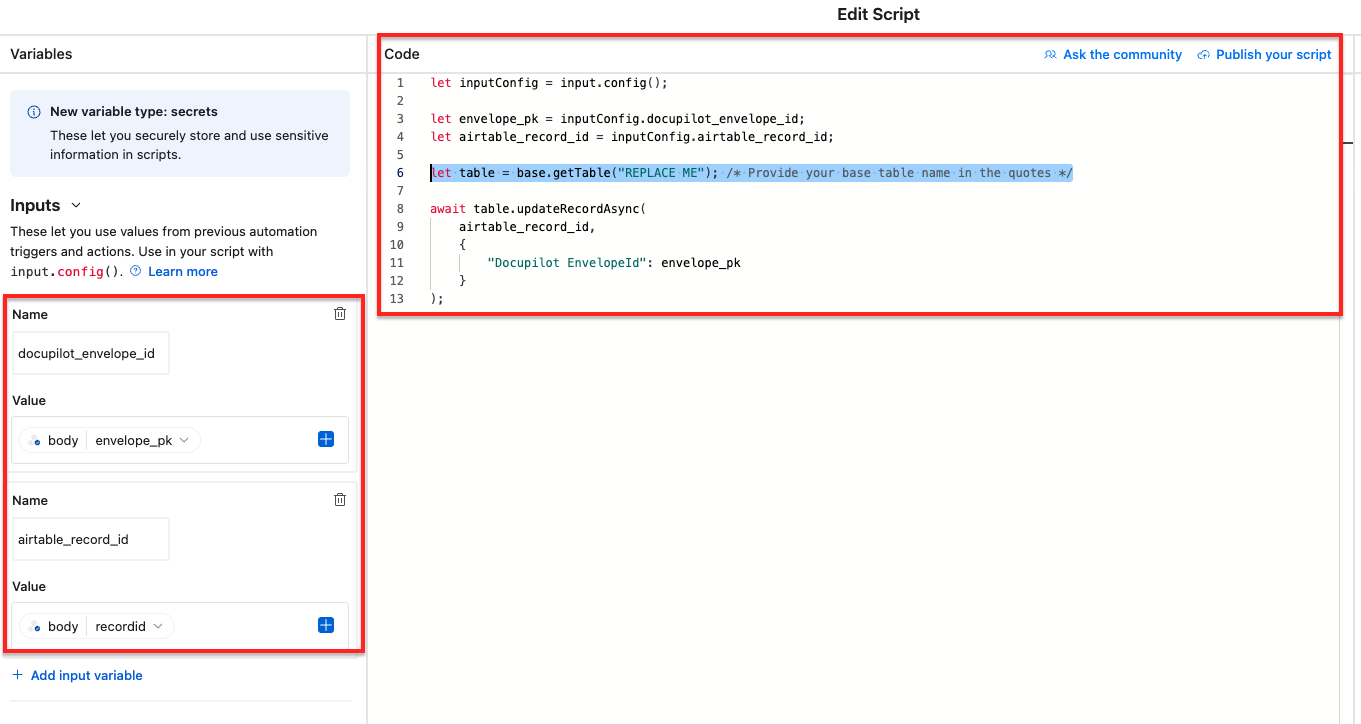
- In the same Airtable Automation, add a Run Script action.
- Click on Edit code, clear the content and Paste the below Script
let inputConfig = input.config();

let envelope_pk = inputConfig.docupilot_envelope_id;
let airtable_record_id = inputConfig.airtable_record_id;

let table = base.getTable("REPLACE ME"); /* Provide your base table name in the quotes */

await table.updateRecordAsync(
    airtable_record_id,
    {
        "Docupilot EnvelopeId": envelope_pk
    }
);
Important Note
In the above script, provide your base table name for the table name in the quotes.
- Once the script is added, create and map the following input variables from the left side tab,
| Variable Name | Value |
|---|---|
| docupilot_envelope_id | body -> envelope_pk |
| airtable_record_id | body -> recordid |
- This script will capture the envelope ID from Docupilot and save it in the
Docupilot EnvelopeIdfield of the related Airtable record. This envelope ID is required later to download the completed signed document.
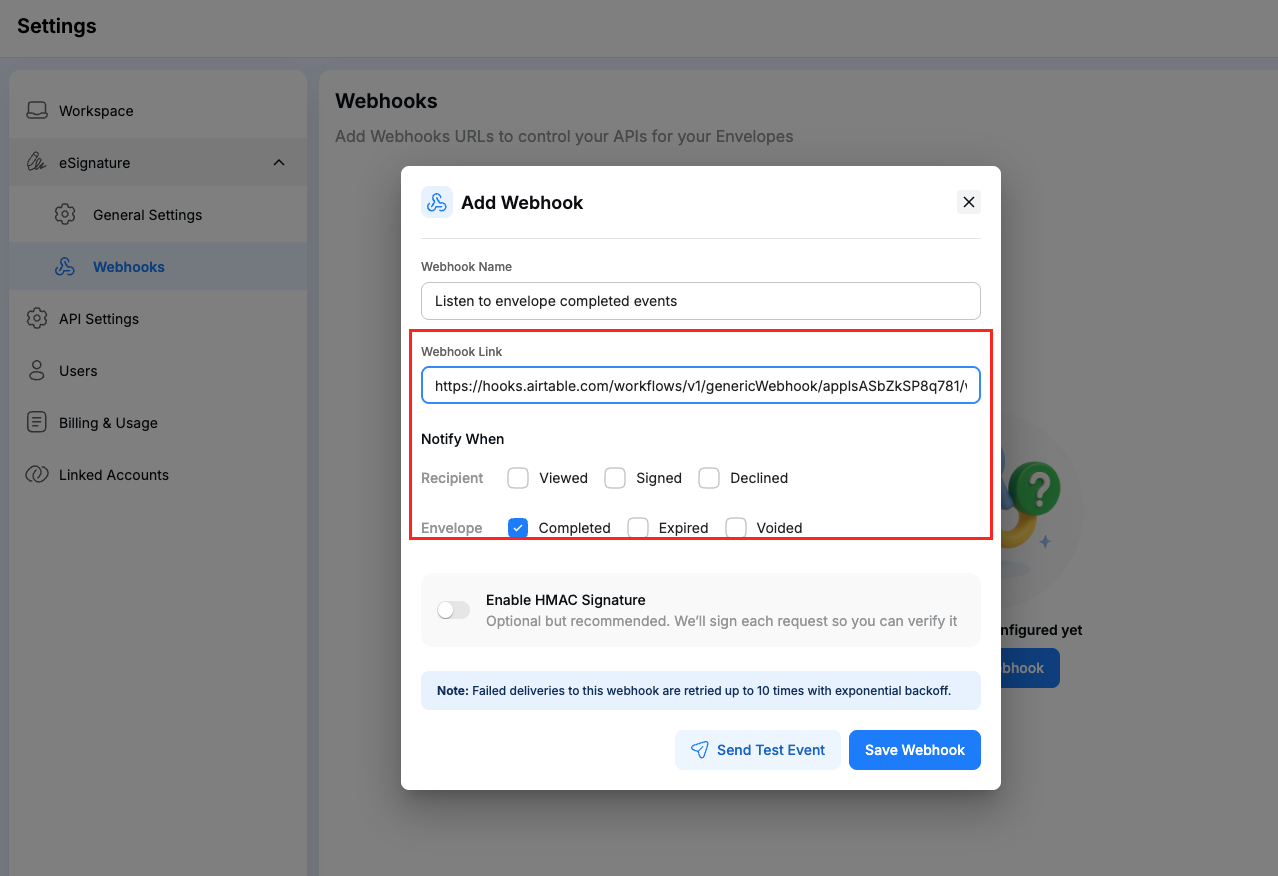
Step 4: Create a Webhook for Completed Envelopes
Now, create a new Airtable Automation to listen specifically for completed envelope events.
-
Add a Webhook Trigger and copy the webhook URL.
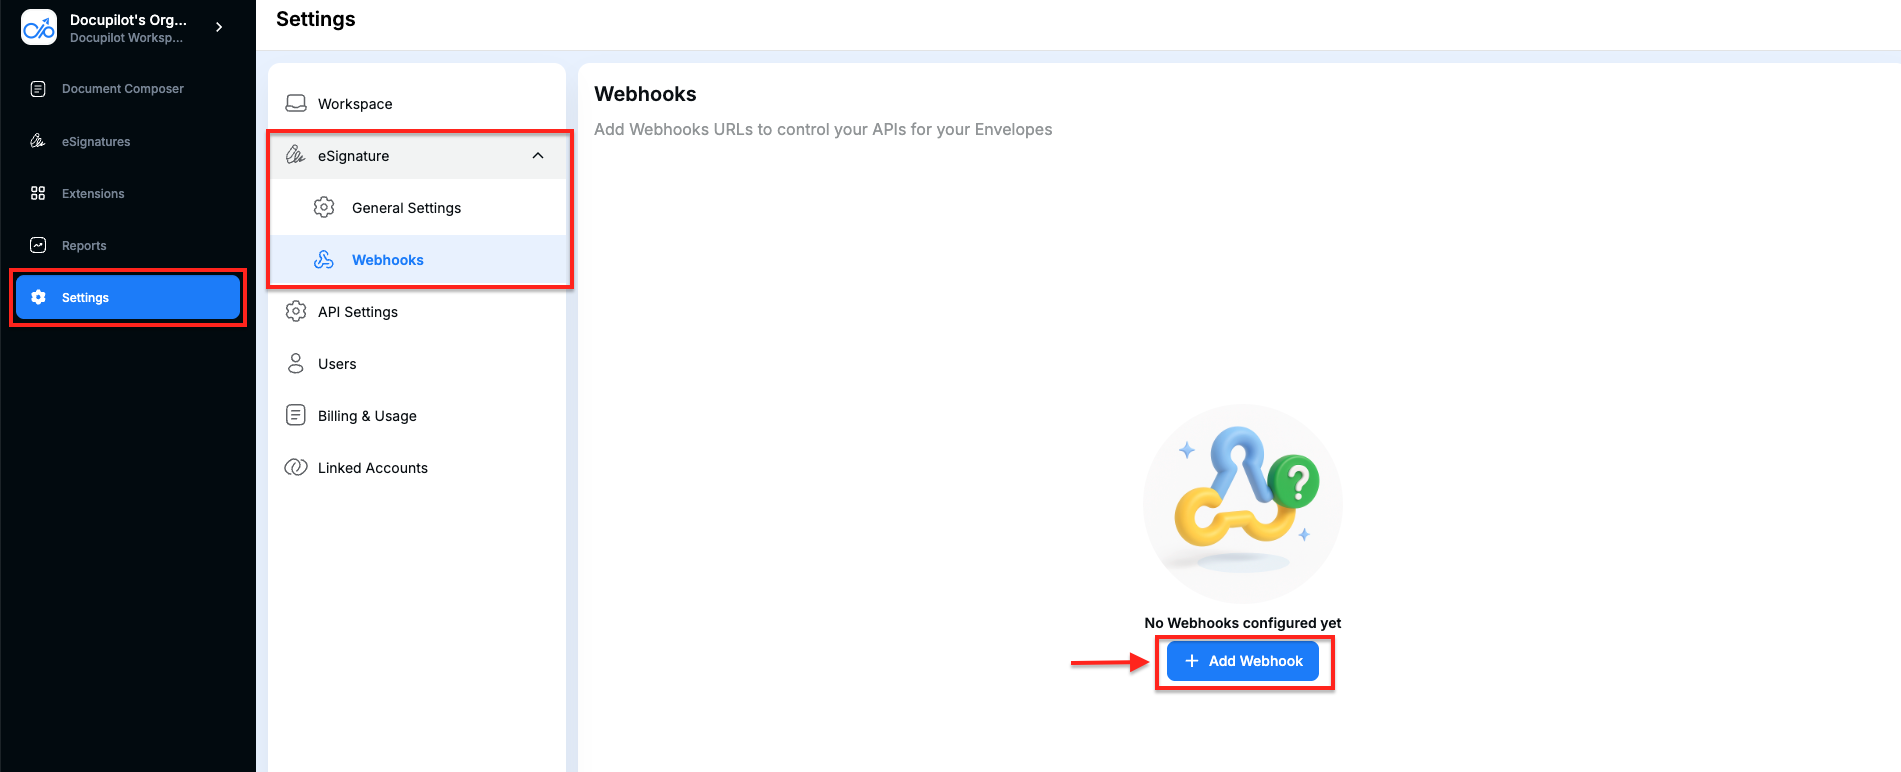
-
In Docupilot, navigate to Settings > eSignature > Webhooks and click on Add Webhook to add the above copied URL.
-
Under Notify when, select completed envelope event and Save webhook. This will listen for completed envelope event.
Step 5: Download the Completed Document and Attach It to Airtable
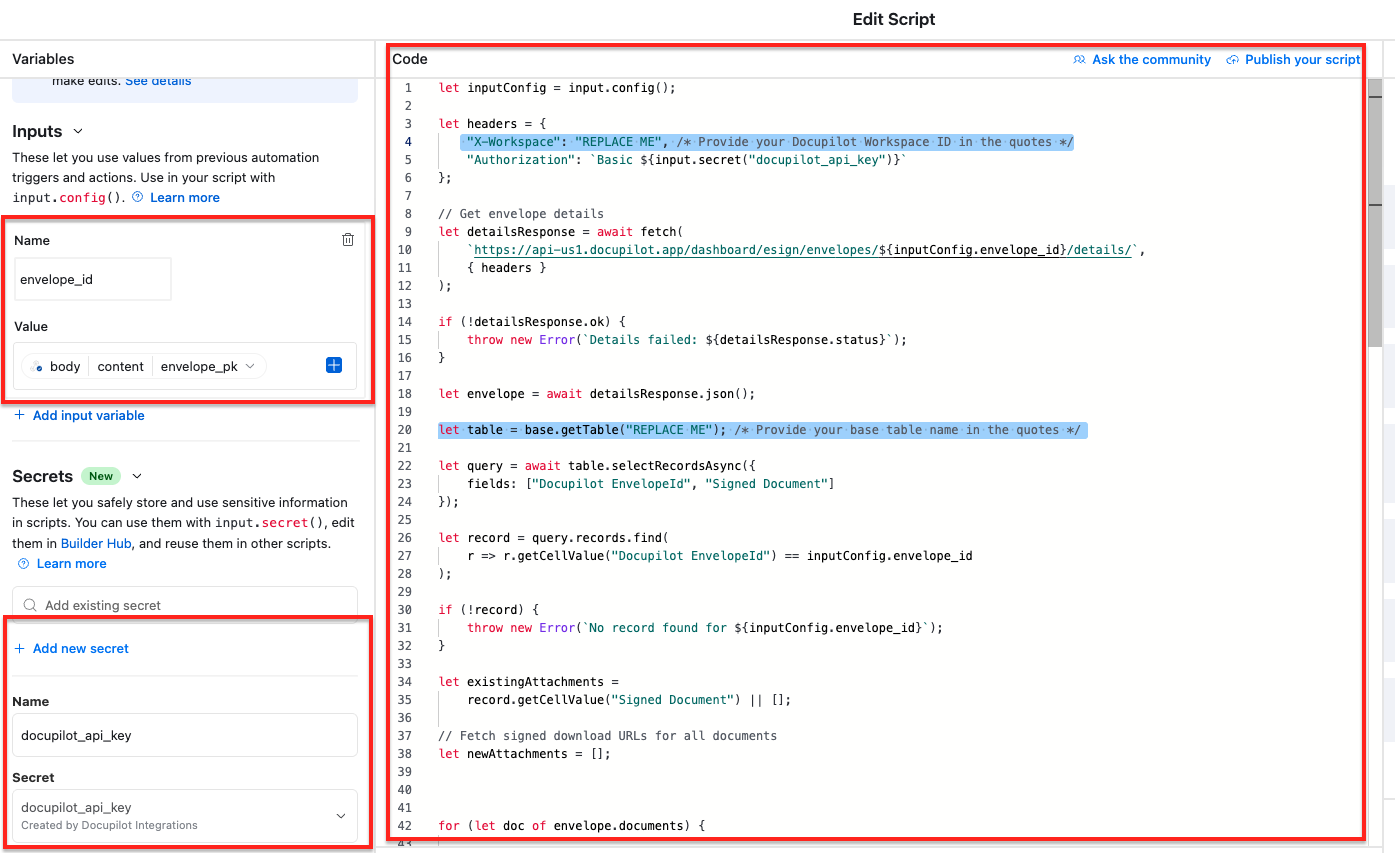
- In the automation created in Step 4, add a Run Script action and Paste the below script
let inputConfig = input.config();

let headers = {
    "X-Workspace": "REPLACE ME", /* Provide your Docupilot Workspace ID in the quotes */
    "Authorization": `Basic ${input.secret("docupilot_api_key")}`
};

// Get envelope details
let detailsResponse = await fetch(
    `https://api-us1.docupilot.app/dashboard/esign/envelopes/${inputConfig.envelope_id}/details/`,
    { headers }
);

if (!detailsResponse.ok) {
    throw new Error(`Details failed: ${detailsResponse.status}`);
}

let envelope = await detailsResponse.json();

let table = base.getTable("REPLACE ME"); /* Provide your base table name in the quotes */

let query = await table.selectRecordsAsync({
    fields: ["Docupilot EnvelopeId", "Signed Document"]
});

let record = query.records.find(
    r => r.getCellValue("Docupilot EnvelopeId") == inputConfig.envelope_id
);

if (!record) {
    throw new Error(`No record found for ${inputConfig.envelope_id}`);
}

let existingAttachments =
    record.getCellValue("Signed Document") || [];

// Fetch signed download URLs for all documents
let newAttachments = [];


for (let doc of envelope.documents) {

    console.log(inputConfig.envelope_id);
    console.log(doc.id);

    let downloadResponse = await fetch(
        `https://api-us1.docupilot.app/dashboard/esign/envelopes/${inputConfig.envelope_id}/documents/${doc.id}/download/?response_type=url`,
        { headers }
    );

    console.log(downloadResponse);

    if (!downloadResponse.ok) {
        throw new Error(
            `Download URL failed for document ${doc.id}: ${downloadResponse.status}`
        );
    }

    let downloadData = await downloadResponse.json();

    console.log(`Fetched signed URL for ${doc.document_name}`);

    newAttachments.push({
        url: downloadData.file_url,
        filename: doc.document_name
    });
}

console.log("New attachments:");
console.log(newAttachments);

await table.updateRecordAsync(record.id, {
    "Signed Document": [
        ...existingAttachments,
        ...newAttachments
    ]
});

console.log(`Added ${newAttachments.length} attachments`);
Important Note
In the above, script please provide your Docupilot Workspace ID for X-Workspace and Airtable base table name for table name.
- Once the script is added, create and map the following input variable and Secret from the left side tab
| Type | Name | Value |
|---|---|---|
| Input Variable | envelope_id |
body -> content -> envelope_pk |
| Secret | docupilot_api_key |
Paste the Generated API Key from Docupilot |
This script will:
- Download the completed signed document from Docupilot
- Find the matching Airtable record
- Attach the signed document to the
Signed Documentfield
Step 6: Activate the Automations in Airtable
- After configuring the workflow, switch both Airtable automations to Active.
This setup helps you manage the document signing process from Airtable and keeps completed signed copies stored against the relevant records.
If you’re stuck or need help with the setup, drop your questions here — happy to assist!